
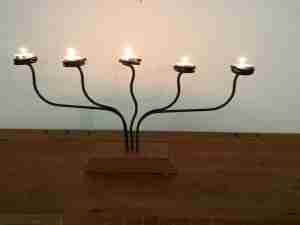
 In this post, we will learn how to make our own unique DIY Tealight candle holders. Compared to most candles on the market Tea-light candles are probably the cheapest of all candles to buy. You can get packs of 200 Tealight candles for as little as $20. Taking the DIY approach we can make a candle holder that will hold several Tealights that will not only look great but will be much less expensive to use than regular candles, and make a great Centerpiece.
These are easy to make and look like metal Tealight Candleholders. They are in fact made from 1/4 inch (6mm) Aluminum rod and painted black or whichever Color you choose. Leave them natural for a silver/pewter look. The reason I’ve used the Aluminum rod for these projects is that the material is reasonably easy to bend as opposed to the steel of the same thickness. Using steel would require a totally different type of bending tools.
We have outlined all the steps needed to make whatever design of Tealight candle holders you can think of. Plus give you some ideas of what can be done to get you started. Be creative and impress your friends with these, they make a great party background piece, mood lighting or Centerpiece at the dinner table.
You can use standard or long burning tea lights with these designs, in fact, the long burn Tealight candles are better suited to these. They are also well suited to Citronella Tealights for outdoors and for inside you could use any of the many Scented Tealight Candles that are now available.
Tools And Supplies To Make Tealight Candle Holders
In the first part, we will go over how to make a jig to bend and shape the metal to hold the Tealight candle. And to shape and bend the stem to what we require. For this tutorial, we will be making the candelabra style Tealight candle holder as shown above. To make any other style of tea-light holder you can use the same jig, the forming of the candle holder itself is the technical part. However, with this jig, you will soon be well proficient and constructing any style you like.
Supplies
- Aluminum rod – 1/4 inch round (6mm). You will need about 8 feet (2.5m ) for this project. Buy a little extra to practice with.
- Tealight Candles
- 4 x 2 lumber for the jig base, 12 inches long. ( 90 x 45 x 300 )
- 3/4 x 3 inch ( 18 x 90mm ) hardwood about 6 inches long, a piece decking timber is perfect. Pine or cypress is ok if you don’t have hardwood.
- 4 x 3/8 inch cup head bolts, approx 4 inches long ( 10mm x 100mm)
- 1 x 1/4 inch hex head bolt 1/34 inches long (6mm x 50)
- Aluminum plate 1/4 x 1-1/2 inches wide 4 inches long ( 6mm x 40mm x 100 long). While this is not essential it will make the bender tool stronger.
- 4 button head screws for the bender plate if used.
- 4 x 2 lumber for the base, approx 8 inches.
- Sandpaper or scotch-bright
- Etch primer spray-paint
- Topcoat spray-paint
Tools Required
- Saw, either handsaw or miter saw
- Hacksaw or metal drop saw for cutting Aluminum rod
- Power drill or drill press
- Multigrip pliers
- Hole saw, 1-9/16 inch ( 40mm )
- Hole saw, 3-1/2 inch ( 90mm) You can if you wish, cut the 3-1/2 inch disc using a scroll or jigsaw.
- 3/8 inch drill bit (8mm)
- 1/4 inch drill bit (6mm)
- 1 inch Spade bit.
- File
- Painting equipment
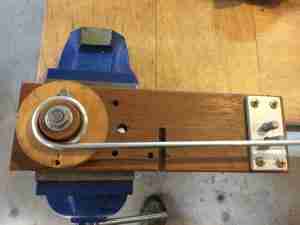
Making Your Candle Holder Bending Jig
 Once built this bending jig can be used for making multiple candle holding arms. The process is simple and can be done in an hour or two. Don’t be in a hurry as some of the measurements need to be accurate. There is plenty of leeways if you do make a mistake with a hole measurement, it is just a case of drilling another hole in a different spot on the jig base. You may well find that you will add your own custom bending holes and pins so don’t be afraid to add more parts to the jig to suit your ideas.
The Process
 Begin by getting all the tools and equipment together, be tidy and organized.
The 4 x 2 timber can be pine or hardwood, for this project I’ve used a piece of Kwilla hardwood. avoid cedar as it’s a little too soft. Take the 4×2 timber and cut to length, about 12 inches (30cm) is fine and can be longer if you like.
Marking and Drilling The Base
Mark out the holes for pins C and D, as shown and drill them to size. The 1-inch spade bit is for recessing the bolt heads into the timber bottom so the jig sits flat on the workbench when its clamped down. These should be drilled first as it’s not easy to do so if the 3/8 bolt holes are drilled first. The only holes we won’t be drilling at this point are A and B.
Note the two pins, C, one hole needs to be deeper on the base so the heads overlap as they are so close to each other the heads get in each other way.
For the other drillings, there are only two sizes of holes to work with, 1/4 and 3/8 (6mm & 10mm). Drill out holes for pins C and D to 3/8 (10mm).
Test the hole size using the 3/8 bolts to ensure that they fit ok. Sometimes if your 4×2 timber is a little green the bolts may be too tight, in this case just open them up a little with the next size drill bit in your drilling kit. Once all your holes are drilled we can move on to the round discs.
Cutting The Round Discs
 Cut the round discs using a hole saw and a benchtop drill press. For the large size, you can do this using a jigsaw if you take your time. Using a jigsaw to cut 3-inch rounds isn’t that difficult but you may need to round off some areas using a wood rasp or low grit sandpaper.
The best timber to use for the discs is hardwood. I find that a piece of hardwood decking is ideal for these. Cut the 1-inch disc also then drill the center holes to 3/8 inch.
Once the discs are cut they can be assembled onto the jig block using one of the 3/8 ( 10mm ) bolts. Cut any excess length of the main through bolt after the nut and washer are tightened.
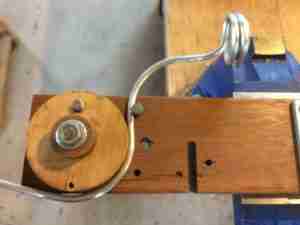
We can now drill the hole for the pin that is the primary bending pin, Pin A. The position needs to be so that you are able to fit the Aluminum rod between the pin and the top round disc snugly and not to lose. So if we use a 3/8 ( 10mm ) bolt here the distance from the 1 inch round to the bolt center will be about 7/16 (10mm).
If you find that the bolt is too close and the aluminum rod won’t fit then simply file or grind the side until you can pass the rod through. An easy way to drill the bending pin locations is to place a 1/4 ” rod against the wooden roller then run your drill along the side.
Drill the hole for pin B in a similar manner. This is not critical and can be half an inch or so away from the edge of the large disc.
Cutting The Side Bending Slot
Next, we need to cut a slot in the side of the jig that will be used as a further bending device. Cut the slot about 2 inches long and 1/4 (6mm) wide. Test that two pieces of Aluminum will fit easily into side by side into the groove. Make the groove a snug fit for the Aluminum, loose enough to be able to move the tealight candle holders freely but not overly sloppy either.
Next drill two holes for the removable pin B on the edge and top next to the groove. Try to keep the hole edge about 1/4 inch away from the slot edge. The pin for these holes takes a bit of force so we don’t want to break into the slot.
Fixing The Universal Bending Pins
In the final stage, we fix two 3/8 bolts, Pins C, to the other end of the jig. These are extra bending tools and are used for a specific purpose and also are handy for general purpose bending for all tealight candle holders.
Notice that I’ve added an aluminum cover plate. This is just to give extra strength but is not 100 percent necessary. If you opt not to use the stiffener plate the bolts will need to be recessed top and bottom so as a nut and washer hold everything secure. Using the stiffener plate, the bolts don’t require top nuts as the plate holds everything in place.
Preparing To Bend And Shape The Aluminum Rod
 There are only three bending processes in bending up our Tealight candle holder. First, we need to cut the Aluminum rods to length. At this point, we can calculate how much material we need to make the candelabra style holder which is a long stem candle holder.
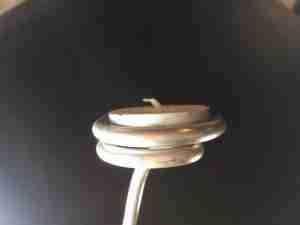
To make the spiral and candleholder base we need about ten inches of material. To make the arms on the candelabra design we need
- two pieces cut at 500mm,
- two at 400mm,
- and one at 200mm for the center holder.
- Clean up the ends using a file or linishing tool
Note; If you intend to paint your candelabra, give the rod a quick rubbing with fine sandpaper or a scotch bright before you start bending anything. This will help remove any residue and give the aluminum a key prior to painting. Much easier to do it now rather than trying to do it once everything is bent up.
Using The Tea light Candle Holder Bending Jig
In the first stage, we need to make the main holder. This is easy enough, once done a couple of times you will get the knack of it. To make the finished candelabra look symmetrical, we will need to bend our four arms left and right. So we will be bending one 400mm left and one 400mm right, one 500mm left and one 500mm right. For the center holder, it won’t matter which way you bend.
Try the whole process using some test pieces first, you will need a couple of test pieces about twenty inches long.
While we’ve cut the round bending mold there are sometimes a need to adjust the size of the finished holder to suit the tealight candle. I’ve noticed that some vairy ever so slightly in size. There are two ways we can go about resizing our candle holder. First, we can simply ‘backbend’ the holder using two end pins of the jig. The other way is to add more thickness to the round head of the jig, I’ve done this by cutting a strip from a used tin can and wrapping it around the jig head
Candelabra Bending Process In Detail
Once we have bent all the candle head holders we need to make a bend under the head to hold the base of the candle to it cant drop through. This is done using the two end bending pins. You will need to hold the head with a pair of multi-grip pliers as you make the bend. It’s also important to bend in the right place so as we can make our next bend successfully. Again practice using the test pieces first.
The next bend is to straighten out the tea light candle holder head so everything looks straight. This is where we use the saw cut bending device. Place the holder in the groove as shown and the pin in the relevant hole. Bend up to a 90-degree angle.
For the candelabra, start by making a measurement 2 inches from the bottom of each of the long arms and marking them with a pencil or marker pen. Then make the first bend from the top as shown In the video. Note the orientation of the arms as we will be bending the left and right-hand sides. The reason for bending left and right is only for appearance, this is so that when looking at the finished Tealight candelabra, the candle holder head bends match up.
Finishing The Candelabra Tealight Candle Holder

 Well done so far! What we have now is the basic design for any style of DIY tealight candle holder we decide to make. They will all undergo this process. The next step in making the candelabra is to go back to our bigger round former and make the bends of the arms themselves. This is straight forward and can be bent to any shape you like.
If you wish to give the finished arms a coat of paint, as they are made from aluminum you will first need to give them a coat of etch primer paint, followed up with two coats of either water-based or solvent-based topcoat. It is quick and easy if you use an HVLP paint sprayer.
There will be fine-tuning to do to get your tealight candle holders looking uniform. This is where the two-pin bender comes in handy, use it to shape the project to look right.
Once you have the stems all made then we just need to fix them to the base. For this project, we have used a piece of dressed hardwood about 8 inches long. Drill holes similar to the pic below.
You can be creative with the base, this one is quite plain but that’s ok. You could router a molded bead around the top, or chamfer an edge. Be creative.
Once the base is done simply plug in your stems and you are done. No real need to glue them in but you can if you wish. This is a great centerpiece for any occasion, indoors or outdoors. Please feel free to post your creations in the comment box.
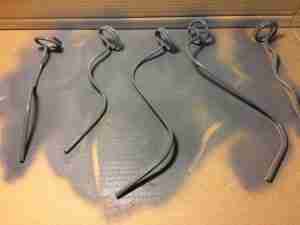
The candle holder stems were painted first with a water-based etch primer undercoat, followed up with two coats of water-based black enamel. All paints were sprayed using a Wagner flexio 590 paint sprayer
This base is simply cut using a compound sliding miter saw. The first cut is at 45 degrees with a 1/4 inch bevel edge cut from each end, thus removing the sharp corners. For a better look cut the same on all four sides.

Hey there, Giving great info about Diy and the tools we use to build and create is the driver behind this site. About Us.